PRODUCT
8 min read


Published on 06/08/2022
Last updated on 03/13/2024
Transferring Data with AWS Data Sync
Share
AWS DataSync is an online data transfer service that simplifies, automates, and accelerates the process of copying large amounts of data to and from AWS storage services over the Internet or AWS Direct Connect. DataSync can be particularly useful when migrating large amounts of data between clouds or from on-premises systems to the cloud.
With DataSync, you can copy data between Network File System (NFS) or Server Message block (SMB) file servers, Amazon Simple Storage Service (S3), Amazon Elastic File System (EFS) and Amazon FSx for Windows File Servers.
I’ll describe the steps you need to take next in two scenarios: the first will describe what to do if you’re transferring data between AWS accounts, and the second will describe what to do if you’re transferring data from on-premises to AWS S3. For an in-depth look at using AWS Data Sync, check out this user guide.
No matter which scenario applies to you, start with these initial steps:
 A DataSync agent is not required when executing S3-to-S3 transfers across accounts and regions. This is internally handled by AWS’ DataSync architecture. For other storage resources — such as EFS and FSx — you can execute DataSync without an agent when transferring within the same account, but you need to use an agent when transferring data across accounts.
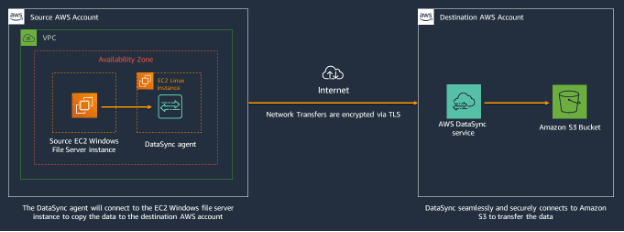
When transferring data between accounts, make sure that your destination account has IAM credentials for accessing your source S3 location data. It is recommended that you run the DataSync service in the destination AWS account to avoid any issues.
Your source account will contain the source S3 bucket and your destination account will contain the destination S3 bucket and run the DataSync service.
A DataSync agent is not required when executing S3-to-S3 transfers across accounts and regions. This is internally handled by AWS’ DataSync architecture. For other storage resources — such as EFS and FSx — you can execute DataSync without an agent when transferring within the same account, but you need to use an agent when transferring data across accounts.
When transferring data between accounts, make sure that your destination account has IAM credentials for accessing your source S3 location data. It is recommended that you run the DataSync service in the destination AWS account to avoid any issues.
Your source account will contain the source S3 bucket and your destination account will contain the destination S3 bucket and run the DataSync service.
 The same dynamics apply when the source (NFS, SMB) is deployed in AWS, as the diagram below shows.
 To execute this transfer, follow these steps:
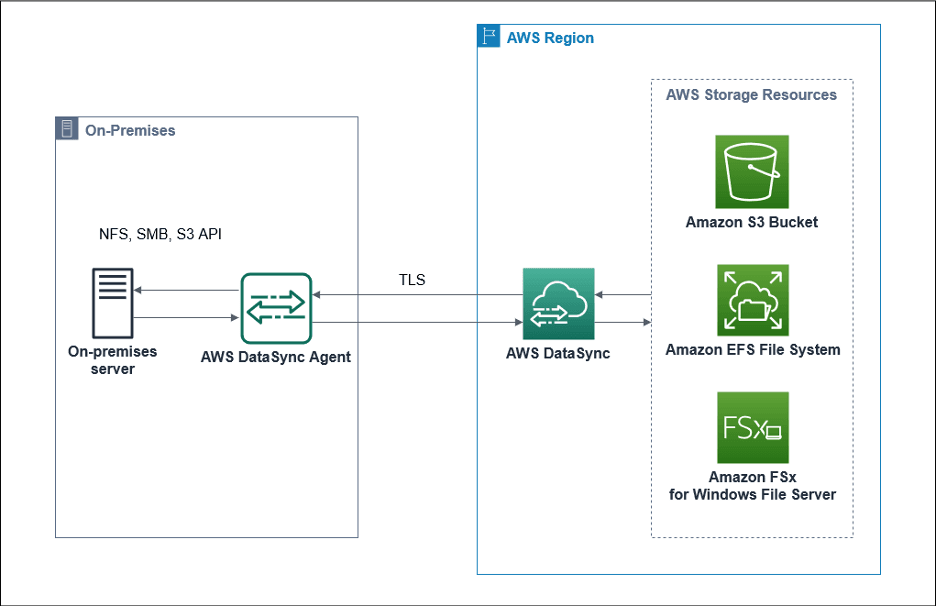
- Deploy an agent, which can be an on-premises VM or an EC2 instance deployed on the source to access NFS/SMB to read and write data.
- Create a data transfer task specifying required data source and destination locations. Configure options for your data, such as file patterns and scheduling.
- Start and monitor your task in the AWS management console or Cloudwatch.
Scenario 1: Data Transfer between AWS accounts with S3 as source and destination locations
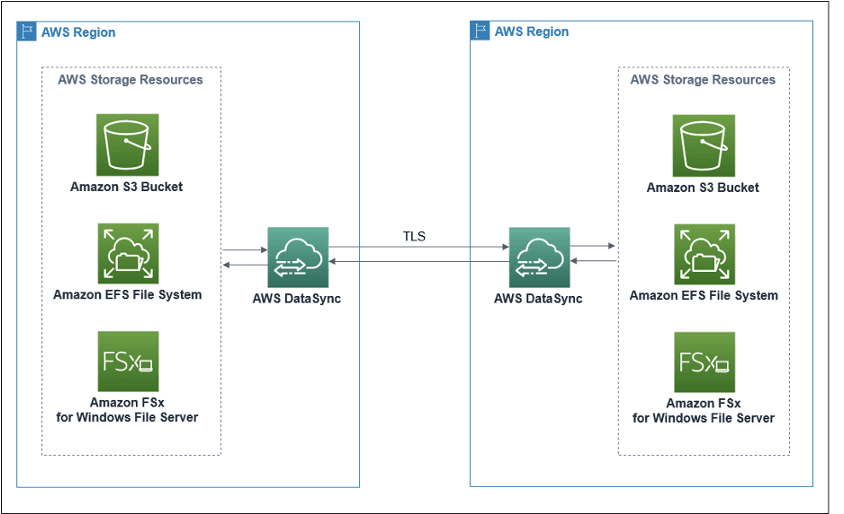
The following diagram provides a high-level view of the DataSync architecture for transferring data between AWS services within the same account. This architecture applies to both in-region and cross-region transfers.
A DataSync agent is not required when executing S3-to-S3 transfers across accounts and regions. This is internally handled by AWS’ DataSync architecture. For other storage resources — such as EFS and FSx — you can execute DataSync without an agent when transferring within the same account, but you need to use an agent when transferring data across accounts.
When transferring data between accounts, make sure that your destination account has IAM credentials for accessing your source S3 location data. It is recommended that you run the DataSync service in the destination AWS account to avoid any issues.
Your source account will contain the source S3 bucket and your destination account will contain the destination S3 bucket and run the DataSync service.
Setup in source account
- Create a S3 bucket(trellis-datasync-src1) in the source account/region with default attributes.
- On the bucket’s Permissions tab, click Bucket policy.

- Click Edit and add the following:
{ "Version": "2012–10–17", "Id": "Policy1616194240988", "Statement": [ { "Sid": "Stmt1616194236908", "Effect": "Allow", "Principal": { "AWS": [ "arn:aws:iam::1111111111111:user/username", "arn:aws:iam::1111111111111:role/CrossAccountAccess" ] }, "Action": "s3:*", "Resource": [ "arn:aws:s3:::trellis-datasync-src1", "arn:aws:s3:::trellis-datasync-src1/*" ] } ] } - Get destination account details by running the following command for AWS destination, to be used in above policy:
❯ aws sts get-caller-identity
{
  "UserId": "ABCDEFGHIJKLMNOP5555",
  "Account": "555555555555",
  "Arn": "arn:aws:iam::55555555555:user/username"
}
Setup in destination account
- Setup a IAM Role CrossAccountAccess for S3 access from the source. For simplicity, I’ve used the AmazonS3FullAccess policy below.

- Click on the Trust relationships tab, where you’ll see the following view.

- Click Edit trust relationship and add the following Trust Policy, which will show up under Trusted entities:
{ "Version": "2012–10–17", "Statement": [ { "Effect": "Allow", "Principal": { "Service": "datasync.amazonaws.com" }, "Action": "sts:AssumeRole" } ] } - Next, create a S3 bucket (trellis-datasync-dst1) in the destination account/region with default attributes. Create the cross account s3 location (for source A), from destination B using the AWS CLI below:
If the command works, below output will be displayed:❯ aws datasync create-location-s3 — s3-bucket-arn arn:aws:s3:::trellis-datasync-src1 — s3-config ‘{**BucketAccessRoleArn**:**arn:aws:iam::5555555555:role/CrossAccountAccess**}’ — region eu-west-1
Now, the source S3 location should show up in the destination view, and we can set up both source and destination locations for the DataSync service.{ "LocationArn": "arn:aws:datasync:eu-west-1:079349112641:location/loc-054160bbd934e32c9" }

- In either the DataSync source or destination view, click Create task to initiate a data transfer with specified parameters.

- Next, configure your source location by selecting Choose an existing location.

- Next, configure your destination location by selecting your destination bucket.

- Next, configure your settings, specifying your Task Name, Task execution configuration, Data transfer configuration, Filtering configuration, and Task logging:
 When you’ve completed configuration, you’ll see details about your task in the following dashboard:
- As the data transfers, you can check your DataSync task execution status by clicking the History tab.

Scenario 2: Data Transfer between on-premises (NFS) as source to AWS S3 as destination
The diagram below depicts the process of transferring data between on-premises servers to AWS S3.
The same dynamics apply when the source (NFS, SMB) is deployed in AWS, as the diagram below shows.
To execute this transfer, follow these steps:
-
- Ensure that your Security Group rules match the requirements for deploying DataSync agent on the source, as shown below:


- Ensure that your Security Group rules match the requirements for deploying DataSync agent on the source, as shown below:
- Simulate on-premises NFS server by deploying an EC2 instance with an EBS/EFS storage system.

- Mount EBS volume on the E2 instance. For more on this process, consult the user guide.

- Ensure that the nfs service is enabled and the nfs path is exported correctly:
 You’ll need CLIs to enable NFS service and export the NFS path:
sudo apt-get update && sudo apt-get install nfs-kernel-server
sudo vi /etc/exports
❯ Add /home/ubuntu/data
*(rw,fsid=1,no_subtree_check,sync,insecure)
sudo service nfs-kernel-server reload
systemctl status nfs-server.service
Set up and activate DataSync agent, locations, and task
Whether you’re in scenario 1 or 2, take the steps below if you’re deploying the EC2 instance as a DataSync agent in an AWS region close to your source location. For the steps you need to take if you’re pursuing other deployment options, see this document.- Create EC2 instance to be used as DataSync agent on the source account. Amazon recommends using one of the following EC2 instance types:
- m5.2xlarge — For tasks to transfer up to 20 million files.
- m5.4xlarge — For tasks to transfer more than 20 million files.
Using the AMI value from the output above, launch the EC2 instance (m5.2xlarge or m5.4xlarge) using the following URL, substituting region and ami-id: https://console.aws.amazon.com/ec2/v2/home?region=source-file-system-region#LaunchInstanceWizard:ami=ami-id If using a security group, assign the above security-group or ensure desired inbound/outbound rules are applicable for this instance. For more on executing this process consult the AWS user guide.❯ aws ssm get-parameter — name /aws/service/datasync/ami — region eu-west-1{ "Parameter": { "Name": "/aws/service/datasync/ami", "Type": "String", "Value": "ami-024d0f6d9d751d0a1", "Version": 20, "LastModifiedDate": "2021–03–02T07:50:22.419000–08:00", "ARN": "arn:aws:ssm:eu-west-1::parameter/aws/service/datasync/ami", "DataType": "text" } } - Once the EC2 instance (DataSync agent) is deployed, log in to your console to get the activation key with your required method using public or VPC endpoints.Note that you’ll need to set Private DNS names to False (unchecked) in VPC endpoints if you’re using the DataSync agent as a public endpoint. If you have agents activated with public rather than private endpoints within the same VPC, if the private DNS option is checked, the agent with public endpoint activation will not be able to resolve the service endpoints. This will cause communication failure that leads to the agent going offline.

Setup on destination account
- Go to DataSync service in AWS management console on destination account and select Create Agent:


- Create an S3 bucket (trellis-nfs-dst) in the destination account/region with default attributes.
- Set up a DataSync source location (NFS server) on the destination account.


- Create a DataSync task to initiate data transfer with specified parameters for source location, destination location, settings and task logging:


- Once on your DataSync dashboard view (see above), click History to check your DataSync task execution status.

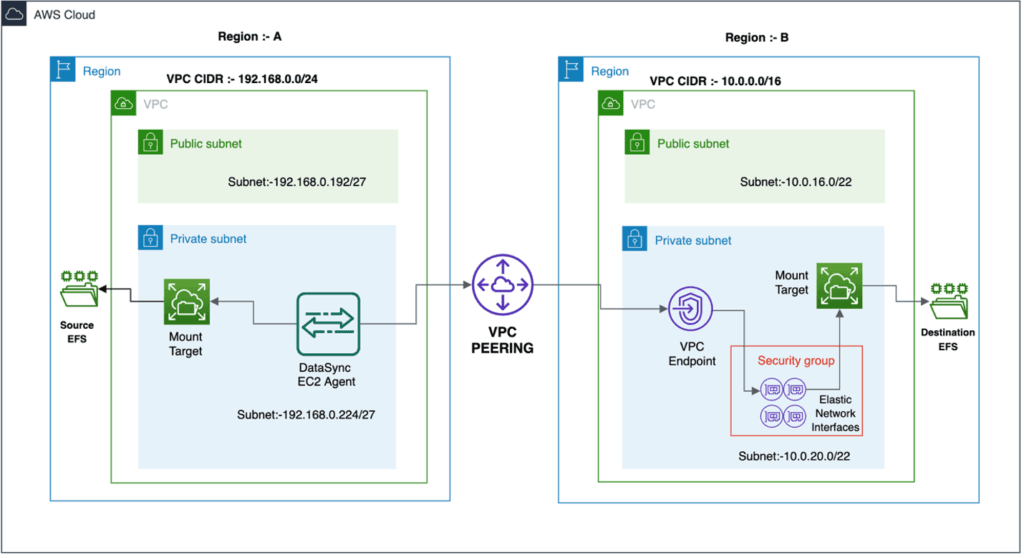
Transferring file data across AWS regions and accounts using VPC peering
For more on how to transfer file data across AWS regions and accounts using VPC peering, see AWS’ documentation titled Creating and accepting a VPC peering connection and Transferring file data across AWS Regions and accounts using AWS DataSync.
Subscribe to
the Shift!
Get emerging insights on emerging technology straight to your inbox.
Unlocking Multi-Cloud Security: Panoptica's Graph-Based Approach
Discover why security teams rely on Panoptica's graph-based technology to navigate and prioritize risks across multi-cloud landscapes, enhancing accuracy and resilience in safeguarding diverse ecosystems.


Subscribe
to
the Shift
!Get on emerging technology straight to your inbox.
emerging insights
The Shift keeps you at the forefront of cloud native modern applications, application security, generative AI, quantum computing, and other groundbreaking innovations that are shaping the future of technology.